Configuration in PrestaShop
1. Information on the payment in PrestaShop
Information on the payment is available in the PrestaShop administration.

You'll find this information:
- Transaction ID
- Currency code
- Payment date
- Fraud Fighter notifications
- Card type
- Amount
The order view also contains a link to your ePay administration that allows you to find and process the payment. The order and transaction IDs in PrestaShop match the IDs in ePay's administration.
2. Settings
Go to Modules in the menu, find the ePay module, and press Configure to find the module settings.
| Type | Description |
|---|---|
| Merchant number | The merchant number you received from ePay. You can find it in the menu Settings -> Payment system from your ePay administration. |
| Window ID | Choose which version of the payment window to use: You can create different versions from the ePay administration via the menu Settings -> Payment window. This is useful if you want to show a different text for foreign customers, if you want to display different payment card logos, or different settings for transaction fees. |
| Remote API | By activating Remote API, you can capture, credit and delete payments from PrestaShop. This means you don't have to log in to ePay's administration to process payments. |
| MD5 mode | We recommend using MD5 to secure the data sent between your system and ePay. |
| MD5 key | If you've activated MD5 in ePay, you have to enter your key here (the same key you entered in your ePay administration). The keys must be perfectly identical in the two systems. |
| Group | You can divide payments into different groups and limit your ePay users' access to specific groups. A group is a name/string. If you don't want to use groups, simply leave the field empty (default). |
| Auth Mail | If you want an email at every completed payment, you can enter an email address here. If you have multiple recipients, separate the addresses with a semicolon (;). Leave the field empty if you don't want to use this service. |
| Add transaction fee to shipping | If you put this setting at Yes, the transaction fee will be added to the shipping costs. |
| Instant capture | By enabling this, the payment is captured immediately. You can only use this setting if the customers receive their goods immediately as well, e.g. downloads or services. |
| Own receipt | Enter the URL here if you want to use your own order confirmation page. The page must be specified in PrestaShop. |
| Use Google Pageview Tracking | Choose if you want to use Google Analytics to track visitors to your website. |
| Enable Invoice Data | Put this at Yes if you want to offer invoice payments. |
| Ageverification mode | Enable age verification either for all orders or only for orders with a delivery address in Denmark. |
| Minimum user age | Set the minimum age for age verification. This setting applies to all products. |
These functions are integrated in the PrestaShop module, but you can manually apply all the functions for the payment window. To do so, define the relevant parameters in your module files. See all available parameters here.
3. Process payments from PrestaShop
You can process payments from PrestaShop without having to log in to your ePay administration.
Ensure that the setting Remote API is put at yes. In the ePay administration the setting is called API/Web service.
Please note that when this setting is activated in PrestaShop, the IP address of your PrestaShop system must be registered in the ePay administration. Do this in the menu: API/Web service -> Access.
To capture a transaction, find the order, enter the amount you want to capture, and press Capture.
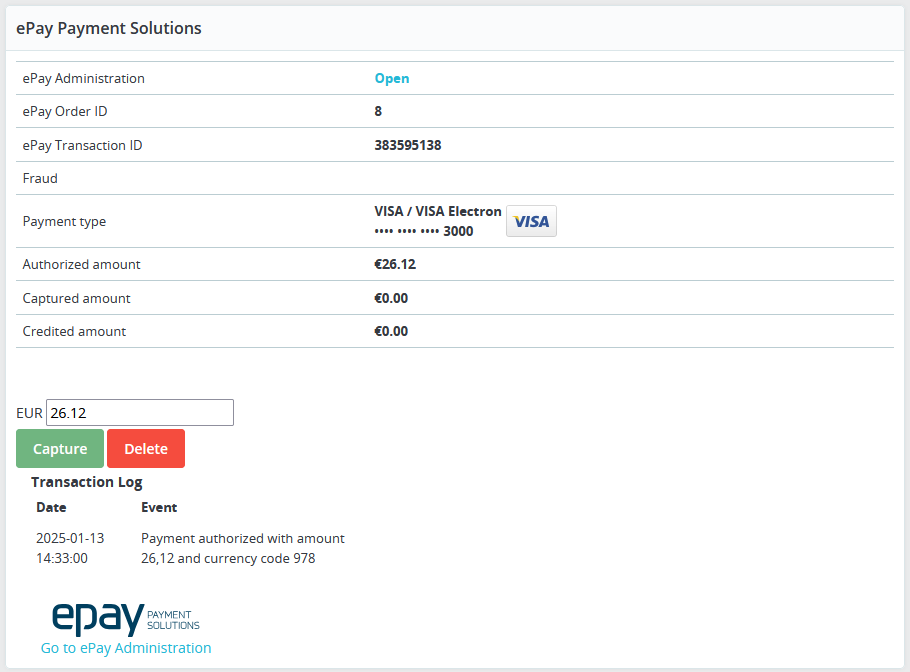
To cancel an order and delete the payment, find the order, and press Delete. The transaction is deleted in ePay's administration.
To credit a payment, find the order, enter the amount you want to refund, and press the Delete button.