FAQ: Integrating the payment system
I received my acquirer agreement. Now what?
When you receive your acquirer agreement (also called a merchant agreement) and are ready to accept real payments in your online store, please forward the agreement to ePay at support@epay.dk. We will then activate your account.
In your shop system, you need to replace your test merchant number with your new production merchant number. Use the parameter merchantnumber or the settings for the module if you're using an open source system.
Please add ePay as a user in your Clearhaus administration. We'll then fetch your API key which we need to activate your ePay account. Find the instructions here.
What is a merchant number?
Your merchant number is the agreement number with your acquirer. You can find it in your ePay administration through the menu Settings -> Payment system and on your merchant agreement.
There are two types of merchant numbers: Test merchant numbers which are used exclusively for test payments, and production merchant numbers which are used for real payments.
Find more info here: I received my acquirer agreement. Now what?
Where do I find error codes?
Error codes are available in your ePay administration here: ssl.ditonlinebetalingssystem.dk/admin
Error codes are divided into two groups: error codes from Nets and error codes from ePay. Error codes from Nets have a value greater than 0, while error codes from ePay have a value lower than 0 (indicated with a minus sign in front of the number).
Error codes from Nets
Available in the administration in Support -> Error codes from PBS
Error codes from ePay
Available in the administration in Support -> Error codes from system
Why do I get the message “Host name is not validated for relay”?
If your domain is blocked when trying to complete a payment, you need to register your domain in the ePay administration. Go to Settings -> Payment system to set up your domain.
If you've already set up your domain, please see the entry What does “Referring domain is not allowed/URL not allowed for relaying” mean?
You have access to one domain by default, but you can buy more. Please contact us if you need more domains.
What does “Referring domain is not allowed/URL not allowed for relaying” mean?
The error messages “Referring domain is not allowed” or "URL not allowed for relaying" occur when the domain from which you’re trying to make a payment is not registered correctly on your ePay account. You can change this from your ePay administration in the menu Settings -> Payment system.
If you open the payment window from example.com, then example.com must be registered in your ePay administration.
If you open the payment window from a subdomain, for instance payment.example.com, you must register example.com in your ePay administration. The system automatically approves all subdomains.
For redirects/forwarding, the domain from which the payment window is opened must be registered in your ePay administration. If the customer clicks on a link at example.com which redirects to payment.com (where the payment window is opened), you must register payment.com in your ePay administration.
Where do I find currency codes?
Currency codes are available in the ePay administration in the menu Support -> Currency codes and on our website here.
What is MD5?
MD5 is a security code that protects your company against fraud.
Use the parameter hash to create an MD5 stamp which consists of the values of all parameters you send to ePay + your MD5 key. The values should be given in the same order they are sent. The MD5 key is simply a password you create and enter in the ePay administration in Settings -> Payment system.
Take a look at how it is set up here.
What is a transaction number?
The transaction number is a unique reference to the payment. It is created in ePay's system when the payment is authorised.
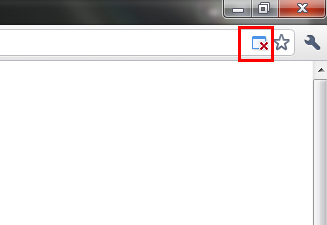
Why won’t the payment window open in Google Chrome?
This happens because Google Chrome blocks pop-up windows by default.
Follow these steps to allow pop-ups in Chrome:
- Press the icon if the payment window doesn’t open
- You get this message

- Click on ‘Always allow pop-ups’ and ‘Done’
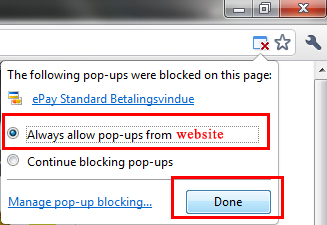
- Press F5 on your keyboard, and the payment window opens
Can I test from localhost?
Yes, you can. Notice that accepturl, cancelurl, and callbackurl must be on a valid domain. Callbacks cannot point to localhost since your callbackurl must be publicly available.
Also, the domain pointing to localhost must be registered on your ePay administration in Settings -> Payment system. If the domain is not registered, you’ll get the error message “Referring domain not allowed”.
Accepturl and cancelurl cannot point to localhost. Instead, run your development environment from e.g. dev.mydomain.com.
How do I get an extra domain?
To open up an extra domain in your ePay administration, all you need to do is write to us stating that you want to open an extra domain and confirm the price of DKK 49 per month. We’ll open an extra domain on your account.
Why is there no padlock icon at payment?
If you’re using the overlay window, the padlock is not shown. However, the data is still sent via an encrypted and secure connection.
If you want your customers to see a padlock, you can either use full screen (instead of overlay) or install an SSL certificate. Contact your web hosting service for more information on installation of SSL certificates.
Why do I need to show ePay's logo on my website?
In short; to show that your e-store is a safe and secure place to shop. It might scare off customers if they cannot immediately tell that your e-store is reliable and safe.
The logo should link to www.epay.dk. You can download ePay's logo here.
You can show the ePay logo with a standard text:
DANISH VERSION
SIKKER BETALING
ePay er PCI-certificeret af
Visa/MasterCard,og al kommunikation foregår
krypteret via en sikker forbindelse.
ENGLISH VERSION
SECURE PAYMENT
ePay is PCI-certified by Visa/MasterCard
and all communication is encrypted.
How do I use my own logo in the payment window?
You control which logo to show in the payment window from your ePay administration under Settings -> Payment window. Press Edit settings on the right. On the next page, you can upload your logo.
Please note that the file size cannot exceed 10 MB and that only the formats JPG/JPEG, GIF, and PNG are accepted. The optimum image size is 175 x 71 pixels.
What is API/web service?
Our API/web service is a service that lets you process your payments from your own shop system without logging in to ePay's administration. A web service is also called an API (Application Programming Interface).
Read more about our web service and how to use it here. Please note that the IP address on which your shop system is installed must be registered on your ePay administration under API/Web services -> Access.
Our API is integrated into most of our payment modules. Click here to see which modules are integrated with API.
How do I govern which payment window to use?
To open different payment windows (with, for instance, different logos) from your shops/domains, use the parameter windowid (Window ID) to govern which payment window to open from the relevant domain.
Read more about the parameter windowid.
Magento
For Magento, please update to beta version 2.5.7 of the ePay module. Configure your Window ID from the module settings.
WooCommerce
For WooCommerce, edit the settings for the ePay module. Put the setting Window ID at the ID of relevant window (default = 1).
If this doesn’t work, remove the value completely and save. Then add it again, and save your settings.
Why can’t I use the back button in the payment window?
Sometimes the browser’s back button won’t work in the payment window. This is due to the payment window being made with postback. You can’t use the back button since it requires a new postback to display the payment window correctly.
You can use this method to prevent your customer from pressing the back button:
-
Set up your website so the customer chooses her payment method on your site, and not in the payment window.
-
Use the parameters paymentcollection and lockpaymentcollection to open the payment window with a specific payment method, which the customer cannot change.
Now the customer chooses the payment method on your website and cannot change it once the payment window opens.
How do I send my API key from Clearhaus to ePay?
We need your API key from Clearhaus to activate your ePay account.
For security reasons, Clearhaus won't send the API key in an email. You need to add ePay as a user in your Clearhaus administration so we can fetch your API key.
Follow these steps:
- Go to your Clearhaus administration.
- Press ’Account’ at the top of the page.
- Click on ’Invite’ to invite a user.
- Use the email address support@epay.dk and enter ePay as the name of the user.
When we've received the invitation, we'll log on to your Clearhaus administration and fetch your API key.
We'll activate your ePay account and send you an email to confirm the activation.